Wednesday, September 25, 2013

'89 Coachman Cab-over camper

Yep, I bought one. 

For $1000 it, came with a refridgerator, queen size bed area, hot water heater, furnace, and also a "wet" bathroom, where the floor is a drain pan so a shower can be taken. Sounds like a lot to cram into the back of a pickup, right? It is. 

And it came with the promise that it "doesn't leak". It does.

Well, did.

I've fixed many holes, cracks, missing sealants with just silicone sealant.

When I made the purchase, I did so knowing the burdensome tasks and long amounts of labor ahead that would allow me to live in it. Oh yes, that is the reason that I had bought it in the first place.

You see, even being a little kid I can remember a feeling I would get as my family would break down the campsite. A sickness, a sadness of sorts, the fact that you had to leave and go back home dropping like a stone in your stomach. Why did you have to leave the sunshine and the lake to go back to the responsibilities and fluorescent lights? It didn't seem fair.  Even when I began camping with my friends, I found myself voting to hike all day and return later in the evening, rather than get home early for a shower and some better food. So what if you could go on a camping trip that doesn't end?

The idea had intrigued me throughout my college years, but school yielded only weekends and summer required a job, per usual. After realizing my love for geology in my sophomore year, and falling madly in love with rocks, I had not put two and two together until my last fall semester in Boulder. In fact, somebody had asked me what my intentions for post graduation were. Having had a few beers I had hastily and sarcastically replied "Living in a camper and looking for rocks", half-serious. As soon as I had said it though, I realized that was what I actually wanted to do. Go on the never-ending camping trip.  Rocks were my key to being outside, something to look for/at/in, and could be used to make ends meet for this never-ending camping trip. So I ruminated on the idea for a few months, but the more I had thought about it, the better it sounded. 

So I bought a camper.

In August of the next year, I had saved up some money from working at a sub shop, and bought the Coachman.
Here it is on my Silverado. Its huge, and weighs around 3000 lbs.

The interior was pretty hideous, with dark wood grain everywhere and rotting orange upholstery.
And it had a rather... unique odor to it. and some carpet that had been in there collecting dirt for ages. When would you ever vacuum carpet in a camper?
Note the lovely wildflower wallpaper, and cream colored plastic sink.

After removing everything with that I deemed needing of painting (including the toilet) and painting it with the various cans of spraypaint found in my parents' house, recoating the countertops with geologic maps, and adding vinyl tile flooring and backsplash, and painting all of the walls and cabinets, it looks a little more like a home for me.
First was the upholstery. A little known fact is that a sewing machine is indeed a power tool. The cushions used about $40 worth of fabric from the fabric store (where sales never seem to end) and a spool of thread. I am no seamster, nor do I claim much more than the ability to thread the machine and sew a straight line, but it wasn't that hard at all to put these cushions together. More thinking than sewing really. 

As for the painting, every forum emphasized the absolute need to sand, prime, sand, and then paint. Well, I had a lot of painting to be done and not a lot of primer.  So I just put paint onto luan (thin, laminate 1/8" thick wood grain paneling used for camper interiors). It took two coats, but its been just fine. I had even painted right over vinyl wallpaper, which if you search around, this would seem a painting sin. Maybe its not the strongest when it gets scratched, but that just means it needs another layer anyways.


Sunday, October 21, 2012

CR Briggs Gold Mine

The CR Briggs Gold mine is located in Death Valley, California. They are mining a gold ore which contains .001-.02 oz./ton of metal. Industry standards and the current price of gold dictate whether this is worth mining. The ore is a sulfide type, which means that there isn't free or native gold in the rock, instead it is locked away in sulfide minerals like pyrite. It is found here because a fault that originated due to the extension of California away from the American plate provided a pathway for gold-bearing fluids to come up. A cyanide leaching process is used to remove the gold from the sulfide minerals.
Overlooking the open pit gold mine. Our guide, William Stanley describes exactly what is going on. The trucks constantly run from the crusher, tailings pile and the bottom of the pit. The dump trucks get directed after they get filled, if they are full of good gold-bearing ore, they go to the crusher. If not, they go to a tailings pile which is saved to fill back in the pit after they are done working. Because there is so much activity, we could only watch from the top at this point. 

Soon enough, a loud buzzer was heard and the pit was cleared for us to drive to the bottom and see the ores.

The two drill rigs to the right side of the picture are there to drill holes for explosives. About every two to three days they blast these explosives, exposing more ore, and making the pit deeper.  Interestingly enough, they had to take into consideration their dust from the blast and how it might affect migrating birds when proposing their operation to the EPA.

Geologist John Kinney stands next to a vein of rich ore down at the bottom of the pit.

Our Suburbans were hardly as high as the tires on these dump trucks. Our guide told us that these were even the smaller variety of trucks, and that the larger kind could fit this dump truck into its bed. They take the gold ore to the crusher, which makes it all into .25" or smaller. This crushed rock is placed onto the leach pad, where sprinklers and drip lines that distribute the cyanide solution keep the heap producing gold.

This is the water that comes out of the Cyanide heap. It is rich in both cyanide which is now bonded with gold molecules. The netting sits over the water to prevent wildlife from accessing the water. As you can imagine, water is rare in Death Valley and so they have quite the variety of wildlife that attempts to get in. Every so often they get tasked with saving a bird from being stuck underneath the netting.

This water is treated by this small building, wrapped in extra barbed wire and secured with several cameras. They bring the water up through activated carbon filters, which precipitate the gold out. This gold is then taken from the carbon using acids and re-precipitated out to produce an ingot of gold and silver. They don't bother to separate the two, they just sell the whole ingot to the refinery. The cyanide leach pit will continue to produce gold for up to 10 or 15 years after the actual mining of material has ceased.

Wednesday, May 2, 2012

Death Valley Spring Break 2012

 This is what you find when you walk around in the lowest place in the United States (-282 feet):
It's salt. And there's a lot of it in Death Valley. Sometimes it is borax as well, which they mined in these parts back in the day. This particular place is called Badwater. There's not much here, just a parking lot, some stairs that lead down to the salt flats, and a green sign with white lettering perched high up in the mountains aside denoting sea level.
 So why were we in Badwater, CA? On a geology field trip.
Why am I doing a handstand in the lowest place in North America? Why not.
Looking South back upon Death Valley, Furnace Creek is almost visible in the left center of the picture. The valley here is very wide, and dunes have formed from sand blowing down the center.
Here, a fault scarp can be seen. This scarp is most likely from one magnitude 7.0 earthquake.
 We drove from Colorado to California to look at fault scarps, and map them. A fault scarp is a steep change in elevation left behind by an earthquake. Death Valley is a interesting place given the topic; active field tectonics. The tectonic activity of earthquakes in CA and the severe lack of precipitation in Death Valley have produced a unique environment where the fault scarps are well preserved and plentiful.
 This is a perfect example of what is called a megabreccia. They form when grinding action of a fault is so strong that the rocks shatter. It also means that the rocks were not at a very high temperature or pressure when they fractured, which makes it hard to explain why they build up so much energy. Most breccias have clasts on the order of pebbles, and a large breccia may have a cobble sized clast. These clasts are the size of volkswagon beetles, and cemented in with a solid cast of calcite. This wall is in the lower stretches of Titus Canyon, a small one-way 4wd road through a beautiful and sometimes forboding narrow canyon.
Looking South from Furnace Creek to the Panamint range, you can see snow on Telescope peak at ~11,000 feet.
Normal faults could be found in the lake sediments, high angle extensional fractures as seen here. Pike, my mapping partner, is for scale and is standing on the hanging wall.

This is a view of the gold mine, which will have to be another post all of its own.

Conglomerate; these were all once rocks that you may see in a river, but have been stretched into cigar shapes due to tectonic stresses.

A large drainage was diverted into a much smaller drainage to save a hotel from seasonal floods that contained a lot of alluvium. In just 50 years, this drainage has been formed, incising ~30 feet.
 Darwin Falls, the last thing you would expect to find in Death Valley
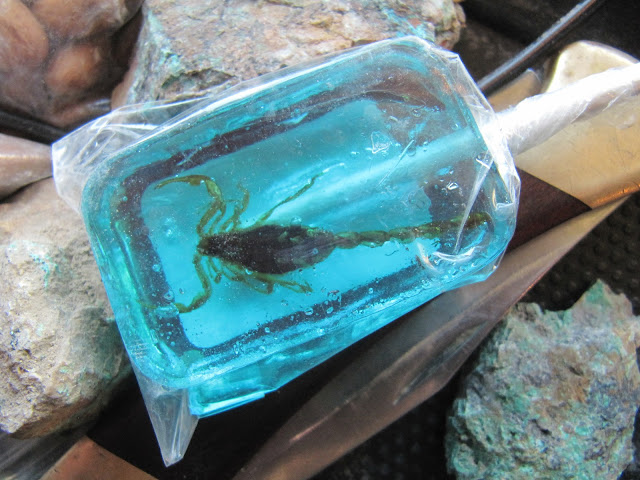
Scorpion Lollipop, and some turquoise found along the way.

Joshua Trees
Sand dunes in the Saline valley. You can see that the alluvial fans are a rough surface. They are covered with cactus and some brush. The scale here is huge though, because the cactus in the foreground may only be about a foot tall, the line of dots below the dunes are cars, about two miles away, and the dunes themselves are approximately another mile from there.

Friday, March 16, 2012

Scours in sedimentary rocks

Scours are sometimes visible in sedimentary rocks, and if you could identify one it allows you to conclude a few things from looking at an outcrop. The most important thing that you can figure out with a scour is which direction the water was flowing as it was created.

These marks in sedimentary rocks are created when the flow of water is suddenly increasing. Mudstone (or sandstone just relatively softer)  is deposited when there is little flow of water, and the the clay particles have time to settle to the bottom. As water speed picks up, the flow can knock pebbles onto this muddy surface.

Directly behind the pebbles that lie on the mud surface, a small suction is created where the water picks up higher speeds as it travels around the pebble. This faster moving water in turn begins to erode away the mud behind the pebble. More pebbles tend to fall in these eroding holes, speeding up the process and resulting in a common indicator of scours, the coarse infill. Knowing that the mudstone is below the coarse infill, you can determine stratigraphic up, or which way was vertical when the rocks were deposited and before they were uplifted.

Scours make a very typical shape that allows you to determine the flow direction of the water. On the upstream edge of the scour, the contact between mudstone and infill will be very steep, almost vertical. On the downstream edge, the slope is gentle into the trough. Using this information, you can determine which way the water was flowing, which can provide interesting insight about the history of the rock.

North Table Mesa Zeolite Crystals

Looking across Clear Creek Valley to South Table Mesa from one outcrop of amygdalar basalt.
Zeolites are microporous minerals formed from aluminum and silica. Microporous means that their mineral structure has large holes in it, and this feature gives way to the usefulness of zeolites.  They can be used to purify water by the means of ion exchange beds that consist of zeolite minerals. For the same reasons they are commonly used in laundry detergents.

Although the zeolites found on Table Mesa aren't useful for purifying water, they are quite spectacular in their occurrence. The delicate and intricate zeolites from this locality are prized rare specimens that rarely occur together in other parts of the world.

They are found in the amygdalar basalts in this locality. Amygdalar simply means that there were holes (or vesicules) in the rock that have been filled in by some material, which is usually calcite or zeolites. If there were no material in the holes, it would be simply a vesicular basalt. The zeolites are reported occur in seven different varieties, but the most common seem to be thompsonite, analcite, chabazite, okenite and mesolite.


A cavity of thomsonite (the tan balls) that has been opened and exposed to weathering.
The basalts of Table Mesa are very difficult to break up. Attempting to break these rocks with a 16 or 22 oz. rock hammer would be rather futile, and its doubtful that your hammer would weigh the same after so much steel would get taken off.  Even my chisels would show a new imprint of the sledge's face after each impact, and the top of the chisel would mushroom out a bit and curl back with each hit. Usually, after smashing at a face for a few minutes with the sledge and chisel, you will get a fracture in the rock.

After a fracture has been propagated, which usually tends to be along the long axis of the zeolite pockets, you have to go and break out the ends of the fractures so that the rocks can be removed. Otherwise, they all fit in just like puzzle pieces that despite being loose do not want to be removed. After demolishing the rock to removable pieces, you get the pure pleasure of removing each piece and inspecting it for crystal-filled pockets.
This amygdule contains analcite, chabazite and thomsonite.

Sometimes you get nothing, and sometimes there are some large cavities. One indicator of finding pockets seems to be oxidation of the rock immediately surrounding the pocket. These little trails of oxidation can lead your hammer from one pocket to the next.

I believe this to be an okenite crystal (~2.5 cm) among chabazite (square white and clear crystals), this specimen (in-situ) was destroyed in the attempt to retrieve.
The zeolites are somewhat zoned, and in some areas different types of zeolites will be found more frequently. For example one area was characterized by large cavities of purely thomsonite. Other areas had cavities filled with thomsonite and analcite, and some contained purely chabazite. The amygdules in the thompsonitic area were commonly 6" long and 2-3" in height and tending to be stretched in a NW/SE direction. The largest was over a foot long and about six inches tall, with two separate cavities attached. It had however been broken out a long time ago and was therefore quite weathered.

Chabazite crystal showing its pseudo-cubic structure.
Also of note was the immediate change of color when the minerals are brought out of pocket. Within five minutes of exposure to air, my translucent green thomsonites had dulled to a tan coating outside. The more weathered thomsonites are completely tan. Also the chabazites, which in their cubic form resemble NaCl or salt crystals, are clear and transparent when first broken out but quickly gain a slightly white coating on the crystal after exposure.
An analcite crystal with thomsonite on basalt matrix,  the analcime is quite large for this locality(~1.5 cm wide)
Although a lot of effort oft results in cracked and damaged crystals, there is a technique to collecting these crystals from the pockets. A hard day's work may result in only one or two nice specimens, and sometimes the best ones escape you. If you decide to head up to Table Mesa, be sure to check that collecting is allowed before you go. Bring along some soft packaging to transport your crystals back to the car, because the jolting of carrying them can also damage the crystals.

Thursday, March 8, 2012

Bailey Creek

I just stumbled across this picture from summer '11 on Bailey Creek, southwest of Denver, CO.  Its a beautiful and continuous class V kayak run through a remote canyon. Towards the end of the run, the canyon flows through a granitic wonderland, with huge (200' wide) boulders scattered in the river channel to create small rapids. While the beginning of the run is definitely all Colorado boating, with tight, steep canyons and quick moves to be made, the granites at the end of the run inspire thoughts of Cali boating.

I'm in the white Jefe in the front center of the picture. My cousin, Ricky Hoberg is performing the move that I had just failed to do, and as a result, am facing upstream. The desired move is to slide off the dry side of the rock back into the current. Otherwise, you get pushed against the rock sticking out of the water just to the left of my bow, which can cause problems.

Just out of view in the bottom of the picture is a large hole, which by the time I had gotten my boat turned back around was right below my feet. The plunge was considerable, probably 6', and I had rolled into it without any forward speed. As my boat slipped over the edge and into the white foam below, I knew I was in trouble. I plunged vertically into the hole below, going so deep that almost my entire boat was submerged before returning to the surface upside-down. After waiting to be flushed from the hole, which didn't take long, I had to try and roll my boat back right-side up, which took about three or four exhausting and breathless attempts.

 On the edge of the river below, when you look upstream to what you have just run, that is the sweetest part. The steepness is apparent when looking back upstream. The adrenaline was flowing and the sun was shining. I don't think that I will ever forget that run.

Monday, January 16, 2012

Barbour Ponds Ice Fishing

On a pleasant friday afternoon, my friend Hamric and I headed to St. Vrain State Park, where the Barbour ponds are located. There are lots of ponds here that hold good fish and good ice for a portion of the year. This was my first time using my own ice fishing gear, including a homemade ice fishing pole, and also using my old auger with new blades.

I pulled my Dad's old hand auger from out of a pile of junk in the shed. My Mom, sister, and myself had probably given it to him as a Christmas gift some years ago. It had been well used until its replacement, the two stroke auger came along. The blades on it were so rusty that they would hardly even scratch the ice. It would have taken hours of effort to bore a hole with those blades that you probably would have had better luck with a pocketknife.

It is tough to recall which ones are old and which ones are new
But for $35 they sell the replacement blades, which can bore a hole like a squirrel on crack going after a peanut butter jar.  While I was buying the blades, I spent a few more dollars on the ice ladle that pulls out all of the chunks remaining from the auger, which is worth it in the long run.

After paying the $7 entrance fee, the attendant informed us that "sandpiper" was fished out, but there were people catching fish on "coot", "mallard", and "bald eagle". The ice was about 4-6", and generally safe.  We drove to mallard and got our gear/beer out on the ice.

Typical Ice Fishing jigs, with quarter for scale.
After being very impressed with the augers first drilling performance, I set up with a small jig with a 1/2 mealworm and splitshot, the typical ice fishing set up. I found the pond to only be around 5' deep. At its deepest we could estimate that it was only around 10' deep.

About 30 seconds after I had dropped my line in, and while I was helping Hamric set up his line, I saw my line run sideways out of the corner of my eye.  When your line moves in the hole, you know that a fish is playing with it down below. I cautiously picked up my rod, and gave it a small tug back. BAM! The fish set, and I pulled it out of the hole. Altogether, I'd had about three feet of line out.

It was a 12" stocked rainbow trout, not more than a minute after having put a lure in the water.

We fished Coot lake and Mallard lake catching lots of fish at each lake. The stocked trout there are hungry. The park ranger who checked our licenses told us that earlier in the year some ice fishers were pulling out 2-300 of these trout per day. Now that would be fun!
Hamric anticipating the next bite.
We caught 8 fish in the few short hours that we were there, and kept seven for a fish fry.


Even thought they were stockers, they still tasted good in trout tacos! The largest we caught was around 15" long.

My next investment into ice fishing will be some cleats. While it isn't too bad slipping around on the ice at first, after just a few hours it becomes annoying. Falling on the ice is painful as I have experienced. Right when you walk away from your pole, which could be after a half hour of sitting with no bites, you look back and the tip of your pole is wiggling. The line is swinging from side to side but you are five feet away. It is impossible to walk, you must dash headlong toward the pole before the fish gets away with your mealworm. But always your feet travel faster than your body without friction against the ice, and you come crashing down on your back knocked windless to lie and watch your line lie still in the water, the fish leaving the hook empty. Long story short, I think i'll make the small investment for some cleats.

All in all, Barbour Ponds in Longmont, CO has some good ice fishing. We were able to take home a nice stringer of fish for dinner and have fun doing it. For the price of $7 and some gas to make the drive from Boulder, it is some decent fishing!